Tuesday, December 31, 2019

D365FO new vertical/ product development

When you complete your brainstorming and designing of new vertical or product in Dynamics 365 for Finance and Operations, the next phase is development. You cannot directly jump on Visual Studio and start coding, there are many steps that you need to do, here are some of them:

  1. Create Azure DevOps project
    Azure DevOps is the new name of previously know TFS (Team Foundation Server). It's basically code repository service with advanced versioning features. I personally prefer Azure DevOps to GitHub, but for D365FO you cannot make your project on GitHub even if it's your favorite. You need to create a project for your product in Azure DevOps; It's free for upto 5 users.
  2. Specify VMs
    In D365FO, like other good renowned software, you need to have different VMs for different purposes. The most needed ones in initial phases are one development VM per developer, one code merge VM (build VM) and one test VM. You may also use your build VM for testing purposes.
  3. Build the Models
    Till this step you may already have a model diagram with you on paper, Microsoft Visio and any other tool. You may also look in this article of how I drew mine,
    https://microsoftdynamix.blogspot.com/2019/12/d365fo-new-vertical-product-architecture.html

    Model is technical classification of elements in your product. All the developments or extensions will be done inside these models.
  4. Start coding
    Now you can connect your Azure DevOps with your Development VM and start coding. Remember to go through Microsoft best practice documents in every blog they share, they help a lot in keeping the product up to date and in high performance.
Best of luck. Thank you!

Monday, December 30, 2019

D365FO new vertical/ product architecture

Hi,

It's common for ISVs to launch their products based on Dynamics 365 for Finance and Operations. Internally they call those products 'Verticals'. There are different stack holders indulged in this process from brainstorming of features till the testing and launching the product. In this blog, I will describe the process of designing the new product in technical perspective. We assume that brainstorming of the product has already been completed. The following steps are most important in this phase as I faced:

  1. Identify elements
    The first step after brainstorming is identifying as much elements as you. By elements I mean anything you can count as user, screen, process or even condition.
  2. UML diagram (Unit)
    Draw UML diagram of each user separately. Try to think as much deep as you can to cater corner cases. I believe that though brainstorming is done while deciding the features, it is a never ending process which shall keep going on till the final steps or even the product is launched to bring improvements in the product. Likewise, drawing drawing UML diagram for each user separately will make your mind think centrally in that perspective and identify processes in its perspective. The diagram below is an example.
  3. Complete UML diagram (Module diagram)
    Now connect those unit diagrams, it is a good idea to draw them on paper with pencil so you can rectify them easily. Module diagram will represent your product in business perspective. It will show the flow and dependency of objects on each other. The diagram below is an example.
  4. Model diagram
    Model is the technical classification of elements. Once every element is identified in Module diagram, you need to look how you can divide them with respect to development. In D365FO it is not good idea to put all your element in one cumbersome model. It is Microsoft best practice to make relevant models. The diagram below is an example.

Thank you!

Thursday, October 17, 2019

D365FO LCS The authentication process was not successful. Please contact your system administrator.

While connecting to create a repository The authentication process was not successful. Please contact your system administrator.


Even if try to add new repository it will give error, like in following screenshots.


You can solve it with following steps:


  1. Remove affected tokens
    The database may have affected key you need to take backup of data of this table and delete the records with following query.


  2. Add new repository
    Now you can add new repository without error


 it will take you to login page where you will give login Id and password, or will directly sign you in if you are already signed in.


Hope it solves your problem. You may comment your problem as well. I faced some other issues as well which I solved but forgot to take screenshots.


Thursday, September 19, 2019

D365FO Failed to generate the user token for Dynamics Lifecycle services on behalf on user {*}. Please contact your system administrator.


While trying to connect to LCS for creating repository I got following errors:

Failed to generate the user token for Dynamics Lifecycle services on behalf on user {4E41*******38B}. Please contact your system administrator.


Even if try to add new repository it will give error, like in following screenshots.


You can solve it with following steps:


  1. Remove affected tokens
    The database may have affected key you need to take backup of data of this table and delete the records with following query.


  2. Add new repository
    Now you can add new repository without error


 it will take you to login page where you will give login Id and password, or will directly sign you in if you are already signed in.


Hope it solves your problem. You may comment your problem as well. I faced some other issues as well which I solved but forgot to take screenshots. Thanks.

Wednesday, September 11, 2019

Microsoft get LCS Project Id

To get your LCS project Id follow these steps:

  1. login to your LCS
  2. Click on your project
  3. Let the main main page of project open. You can now get the LCS project Id from the address bar (URL). It is usually 7 digit number.

Wednesday, August 21, 2019

D365FO Sync failed RouteOperationPropertiesResourceRequirementStaging duplicate record

While restoring data from a newer version 'Version 10 Update24 (7.0.5179.35389)' of AX to older version I faced the following error:

"
Table Sync Failed for Table: RouteOperationPropertiesResourceRequirementStaging. Exception: System.InvalidOperationException: Database execution failed: The CREATE UNIQUE INDEX statement terminated because a duplicate key was found for the object name 'dbo.ROUTEOPERATIONPROPERTIESRESOURCEREQUIREMENTSTAGING' and the index name 'I_17244STAGINGIDX'. The duplicate key value is (5637144576, 6_Resource requirements for route operation properties, 6_Resource requirements for route operation properties-2019-08-20T12:21:09-B9A8188398E6401, 0).
"

Solution:

The error is due to the index allow duplicate property. In earlier version it didn't allow duplicate records in new version the problem is fixed and it does allow duplicate records. Because in my case I was taking data from newer version to older version I had to face this issue. Do following steps:

  1. On target VM (older version one), open SQL server and take backup of table 'RouteOperationPropertiesResourceRequirementStaging' data i.e. Generate script and in advanced property select Type of data script to 'Data only'.
  2. Delete truncate RouteOperationPropertiesResourceRequirementStaging table in target VM.
  3. On source VM (newer version one) go to 'AOSService > PackagesLocalDirectory > ApplicationSuite > Foundation > AxTables' and copy RouteOperationPropertiesResourceRequirementStaging. Paste and replace this element on target VM in same location.
  4. Build Application Suite and Application Foundation models and Synchronize database.
  5. After synchronization runs successfully copy and run the SQL insert query you took backup in step 1.

Comment if you need to need any help. Thanks.


Thursday, August 15, 2019

D365fo deploy reports through powershell

To deploy report use powershell following commands:


  1. All reports in all modules

    K:\AosService\PackagesLocalDirectory\Plugins\AxReportVmRoleStartupTask\DeployAllReportsToSSRS.ps1 -PackageInstallLocation "K:\AosService\PackagesLocalDirectory"

    Here the AOS resides in K drive.
  2. All reports in specific module

    K:\AosService\PackagesLocalDirectory\Plugins\AxReportVmRoleStartupTask\DeployAllReportsToSSRS.ps1 -PackageInstallLocation "K:\AosService\PackagesLocalDirectory" -Module ApplicationSuite

    Here all reports in Application Suite module will be deployed
  3. Specific report in specific module

    K:\AosService\PackagesLocalDirectory\Plugins\AxReportVmRoleStartupTask\DeployAllReportsToSSRS.ps1 -PackageInstallLocation "K:\AosService\PackagesLocalDirectory" -Module ApplicationSuite -ReportName MyCustomReport.Report

    Here MyCustomReport.Report inside the Application Suite module is deployed.

Wednesday, August 7, 2019

D365FO Database sync failed duplicate key on ProjHierarchySorting table

While taking my one server data to other, I faced the following error on Synchronization of database:


"Database execution failed: The CREATE UNIQUE INDEX statement terminated because a duplicate key was found for the object name 'dbo.PROJHIERARCHYSORTING' and the index name 'I_19940NODEREFERENCE'. The duplicate key value is (5637144576, usmf, 0, , 0)."

I opened Sql server and found there were 22 records with many level columns having 0 value. I took backup of table data and deleted all the records with delete query.
Then I ran DB sync again from VS and it ran successfully.

Thursday, July 25, 2019

D365FO batch jobs not executing

"Batch job not executing", is one of the common problem we face in AX. Its solution is simple. Here are different reasons why batch job does not execute  and how to solve them:

  1. Batch job service
    The batch job service is not running. To check go to Services and check if the batch management is running. If it's stop, start it.
  2. Batch job is on Withhold state
    The batch job is paused (Withhold status). Go to batch jobs (System Administrator > Inquiries > Batch Jobs), find your batch job and make sure it's not in Withhold state.

    If it is withhold, from action pane click on Batch job > Functions > Change status. It will open a dialog.
    From the dialogue select waiting and click Ok. Now your job will wait for its turn to execute.
  3. Batch group server
    Make sure the batch group your batch job is attached to, is assigned to a batch server.
    Go to (System Administrator > Setups > Batch groups) click on your batch group and click the Server tab. Make sure a server is assigned to this.
  4. Number of batch jobs with less recurrence time
    If you have multiple batch jobs which have very less recurrence time. It will gradually increase the load and won't give enough time to bigger batch jobs to complete, resulting a pile of batch jobs waiting for a thread which can execute them. In this case try to withhold some of unnecessary batch jobs all allow other to get chance to execute.
  5. Database drive size
    Check if you have enough storage available on database drive. If you have saved your backups there move it to some other locations.

Wednesday, June 26, 2019

D365FO delete TFS workspaces (ghost workspace)

Hi,

It becomes headache one needs to change TFS account on Visual Studio. Following these steps may save your lots of time cleaning your previous workspace and configure new one. First try the lucky way if it didn't for you go for painful way.

Lucky way:

1- Close Visual Studio

2- Open Run (Win+R) and paste one by one the following and delete anything inside:
    %localappdata%\Microsoft\Team Foundation\6.0\Cache\
    %localappdata%\Microsoft\VisualStudio
    %localappdata%\Microsoft\VSCommon
3- Restart your VM

4- Open visual studio and configure with new account

Painful way:

1- Close Visual Studio

2- Open Run (Win+R) and paste one by one the following and delete anything inside:
    %localappdata%\Microsoft\Team Foundation\6.0\Cache\
    %localappdata%\Microsoft\VisualStudio
    %localappdata%\Microsoft\VSCommon
3- Open command and run following commands:
  • Goto IDE folder where the workspace program exist
    Cd C:\Program Files (x86)\Microsoft Visual Studio 14.0\Common7\IDE
  • Check all the current workspaces
    tf workspaces /server:https://dev.azure.com/{org} /computer:{ComputerName} /owner:* /format:detailed
  • If you see any ghost workspace delete it
    tf workspace /delete /server:https://https://dev.azure.com/{org} '{WorkspaceName};{UserName}

    if above command give error run it with user id instead of username
    tf workspace /delete /server:https://https://dev.azure.com/{org} '{WorkspaceName};{UserId}
  • Run this command to sure it's deleted
    tf workspaces /server:https://dev.azure.com/{org} /computer:{ComputerName} /owner:* /format:detailed

4- Restart your VM

5- Open visual studio and configure with new account


Comment if you stuck anywhere, I have wondering around this for 2 days, will try to help in anyway.

Monday, May 20, 2019

D365FO Platform update lcs GlobalUpdate script for service model: AOSService on machine: Dev

Hi,

I needed to update a Machine (Dev) from Application version 8 PU21 to PU24. The LCS gave the error on step 19 (from total 35).

lcs GlobalUpdate script for service model: AOSService on machine: Dev

I downloaded the log file, inside folder RunbookExecution-ExecuteParallelRunbook-** I got the log file of all steps. As in my case the error was on step 19 I directly checked the error log on step 19. It can differ in your case. I found multiple table errors in the file which stated:

Table Sync Failed for Table: *TheTableName. Exception: 
System.InvalidOperationException: Database execution failed: Violation of PRIMARY KEY constraint 'I_65518FIELD'. Cannot insert duplicate key in object 'dbo.SQLDICTIONARY'. The duplicate key value is (TableId, FieldId, 1, 0).

The error explains there already exist a field in the table with same field Id. Also the error took to explore SqlDictionary Table. The table contains all tables and their fields with their Id. There is another known table which stores such information and that is TableFieldIdTable.

I wrote following query to check if the fields in these table share consistent information:

First Query:

Select T.ID, T.NAME, T.TABLEID, S.FIELDID, S.Name,
(SELECT TOP 1 Q.NAME from SQLDICTIONARY Q WHERE Q.TABLEID = T.TABLEID AND Q.FIELDID = 0) AS TableName
from TABLEFIELDIDTABLE T
JOIN SQLDICTIONARY S ON T.TABLEID = S.TABLEID AND T.NAME = s.NAME
WHERE S.FIELDID <> 0 AND S.FIELDID <> T.ID
and T.TABLEID in (4451,14445,12235)
ORDER BY T.TABLEID

The above query returns all the fields which don't have same field Id on SqlDictionary and TableFieldIdTable. 4451,14445 and 12235 are the table Ids which I was getting error in log file. Yours may be different.

Hence, I needed to update the SQLDictionary table field Ids according with the field Ids in TableFieldIdTable. I wrote following queries:

Second Query:

Select S.FIELDID
from TABLEFIELDIDTABLE T
JOIN SQLDICTIONARY S ON T.TABLEID = S.TABLEID AND T.NAME = s.NAME
WHERE S.FIELDID <> 0 AND S.FIELDID <> T.ID
and T.TABLEID = 12235
and T.ID = 24

In the above query 12235 is table Id I was getting error. 24 is the field Id in TableFieldIdTable which I got from first query the blog. Second query is just for verification of field to exist. I needed to change the field Id value in SqlDictionary which was 19 then. So wrote following query to update SqlDictionary field Id to 24.

Third Query:

Update SQLDICTIONARY
set SQLDICTIONARY.FIELDID = 24
where SQLDICTIONARY.FIELDID = (
Select S.FIELDID
from TABLEFIELDIDTABLE T
JOIN SQLDICTIONARY S ON T.TABLEID = S.TABLEID AND T.NAME = s.NAME
WHERE S.FIELDID <> 0 AND S.FIELDID <> T.ID
and T.TABLEID = 12235
and T.ID = 24)
and SQLDICTIONARY.TABLEID = 12235

In the above query 12235 is table Id I was getting error. 24 is new field. The second query in blog is used as it is inside the third query (highlighted). I had to repeat the query carefully with the all faulty field Ids (there were 5 in total in my case). It can be different in your case.

Finally, I resumed the PU update process from LCS and it succeeded.


Thursday, May 16, 2019

D365FO Open local VM client from outside VM browser

To access D365FO local environment from outside is easy. All you need is to add local server IP and D365FO main page link to your host file.


  1. Open notepad as administrator
  2. Click open from file menu and navigate to 'C:\Windows\System32\drivers\etc'
  3. Select 'All files (*)'
  4. Opens hosts
  5. In the final line add your machine IP <space> usnconeboxax1aos.cloud.onebox.dynamics.com
  6. Save the file.

Now you can access the environment from outside VM from the machine where you have configured it.


Tuesday, April 23, 2019

D365FO table browser object reference not set to an instance of an object

Meanwhile your development you may face the error 'Object reference not set to an instance of an object' in Visual Studio while opening table browser. Follow the following steps to get rid of this error.

  1. Build the custom model with database synchronization checked.
  2. Reset IIS.
  3. Refresh AOT.
Several other blogs have suggested to do only step 1, which is not sufficient. Doing step 2 and 3 will definitely resolves the issue as it did in my case.   

Thursday, April 11, 2019

D365FO get workflow comment (submission, rejection, approval or any comment) X++

You can get workflow comment at any stage, be it from submission, approval, rejection or any other stage. There will be only one query for all of them with only change of an Enum WorkflowTrackingType value highlighed in the query below.

In this method , for example, the rejected comment of Purchase order workflow is fetched through query by filtering workflowTrackingTable.TrackingType with Rejection element of the enum.


private WorkflowComment getPORejectedWorkflowComment(PurchId _purchId)
{
        WorkflowTrackingTable           workflowTrackingTable;
        WorkflowTrackingStatusTable     workflowTrackingStatusTable;
        WorkflowTrackingCommentTable    workflowTrackingCommentTable;
        PurchTable                      purchTable;

        purchTable = PurchTable::find(_purchId);

        select ContextCompanyId, ContextTableId, ContextRecId from workflowTrackingStatusTable
        where workflowTrackingStatusTable.ContextCompanyId    == curext()
           && workflowTrackingStatusTable.ContextTableId      == purchTable.TableId
           && workflowTrackingStatusTable.ContextRecId        == purchTable.RecId
        join firstonly TrackingId, CreatedDateTime from workflowTrackingTable order by CreatedDateTime desc
            where workflowTrackingTable.WorkflowTrackingStatusTable == workflowTrackingStatusTable.RecId
                && workflowTrackingTable.TrackingType == WorkflowTrackingType::Rejection
        join Comment from workflowTrackingCommentTable
            where workflowTrackingCommentTable.WorkflowTrackingTable == workflowTrackingTable.RecId;

        return workflowTrackingCommentTable.Comment;
    }

The enum WorkflowTranckingType has following elements, specifying which you can get the specific comment:


Wednesday, April 10, 2019

D365FO turn off maintenance mode

You may face some problem like batch management service is not starting. It is because the maintenance mode is enabled. You have to run the following command on VM to disable maintenance mode. Run CMD as administrator and execute following command:

C:\AosService\PackagesLocalDirectory\Bin\Microsoft.Dynamics.AX.Deployment.Setup.exe --metadatadir C:\AosService\PackagesLocalDirectory --bindir C:\AosService\PackagesLocalDirectory\Bin --sqlserver . --sqldatabase axdb --sqluser axdbadmin --sqlpwd AOSWebSite@123 --setupmode maintenancemode --isinmaintenancemode false

In the previous command the AOS is installed in 'C' drive, the database administrator user is 'axdbadmin' and its password is the default password of axdbadmin 'AOSWebSite@123'.

Tuesday, April 9, 2019

Microsoft One Version, D365FO easy update

You need updated features of Microsoft D365FO for easy flow of your business processes. You may still be wavering whether to update your D365FO new version or not. This is very normal because you need see time, budget and relevant capability to do this; simply you can say,"The update is difficult." Thanks to Microsoft One Version which makes totally easy. The One Version is the update service that Microsoft itself runs on partners and customers environment. Microsoft does so to keep all environments consistent, up to date, seamless and error free. To feel not being forced to always update like we experienced on Windows 10, customers and partner can pause automatic update in this case; and even can control features in deployment.

The 'easy' term is used due to effortless update w.r.t customers. The partner/ customer receives notification for the update time scheduled on cloud environments and receives another when update is completed. The result log can be monitored in LCS. All the updated features will be available when update is done.

While it may look very fluent from outside, there are many process included to make this happen. They are as follows:

Regression Suite Automation Tool (RSAT):
It is a scripting tool. Specific to partner/customer organization environment the regression test script is run before update is processed on production.

Safe Deployment Rings (SDR):
The version and update process is taken step wise. Each update is first carried out internally on Microsoft environments, then to partner and finally on environments of customers. The process progresses to new step only when successfully completed. 

Release Validation Program (RVP):
For insuring successful general release which fits on every type of organization Microsoft uses RSAT suites provided by diverse partner/customer environments and run the regression script internally as part of SDR in addition to its own script.

Update time control:
Microsoft has given control to customer in case updates need to paused. You can find it Here on how it can be done.

Features control:
Customers can manage the features in their deployments. Deciding when the new feature shall be added and shall be adjustable to customer own business process.


The Microsoft One Version is undoubtedly an one of the biggest service related to updates. Making update a simpler and quite less threatening as it is managed by Microsoft through its many high quality processes and techniques. It relieves both the technical guy who carried out updates and customers by giving new feature control feature.


Thursday, April 4, 2019

D365FO get Vendor/Customer account from ledgerJournalTrans

You can get Vendor or Customer account from following ways:


1-  VendTable = VendTable::findByLedgerDimension(ledgerJournalTrans.LedgerDimension);

2- MainAccount MainAccount = MainAccount::findByLedgerDimension(LedgerDefaultAccountHelper::getDefaultAccountFromLedgerDimension(ledgerJournalTrans.LedgerDimension));

vendTable = VendTable::find(MainAccount.MainAccountId);

3- MainAccount MainAccount = LedgerDimensionFacade::getMainAccountFromLedgerDimension(ledgerJournalTrans.LedgerDimension);

vendTable = VendTable::find(MainAccount.MainAccountId);

D365FO Entity data populating from staging table to target table

Adding a custom field through extension in standard entity, you may encounter a problem where all fields are populated in staging table (including the custom field) but not in target table. The custom field will not make to be populated in main table after doing all necessary mapping. In this case you need to make post eventhandler of copyCustomStagingToTarget on entity.

In this example, a new field by name 'CustomField' on CustInvoiceLine table needs to be populated using FreeTestInvoiceEntity. The method execution will get 'CustomField' from staging table and update it in the target table.


/// <summary>
/// Populate custom field
/// </summary>
/// <param name="args"></param>
[PostHandlerFor(tableStr(FreeTextInvoiceEntity), tableStaticMethodStr(FreeTextInvoiceEntity, copyCustomStagingToTarget))]
 public static void FreeTextInvoiceEntity_Post_copyCustomStagingToTarget(XppPrePostArgs args)
 {
        DMFDefinitionGroupExecution                 _dmfDefinitionGroupExecution =  Args.getArg('_dmfDefinitionGroupExecution');
        FreeTextInvoiceStaging                      staging;
        CustInvoiceLine                             custInvoiceLine;
        CustInvoiceTable                            custInvoiceTable;
      
        custInvoiceLine.skipDataMethods(true);
        SelectableDataArea currentCompany = curExt();

        update_recordset custInvoiceLine setting
                CustomField = staging.CustomField
            join custInvoiceTable
                where custInvoiceTable.RecId == custInvoiceLine.ParentRecId
            join staging
                where staging.DefinitionGroup       == _dmfDefinitionGroupExecution.DefinitionGroup
                    && staging.ExecutionId              == _dmfDefinitionGroupExecution.ExecutionId
                    && staging.TransferStatus          == DMFTransferStatus::Completed
                    && staging.LineNumber             == custInvoiceLine.LineNum;
    }

Thursday, March 28, 2019

D365FO get LedgerDimension from DefaultDimension X++

LedgerDimension contains both main account information and the default dimension values. You can get the values of other if you know any of them. In D365FO LedgerDimensionFacade class is used to get LedgerDimension value, the classes used in AX 2012 are deprecated. 

     LedgerDefaultDimensionValueSet     defaultDimension;
     MainAccountRecId                            mainAccountRecId;
     LedgerDefaultDimensionValueSet    ledgerDimension;

//You can get the value of defaultDimension and mainAccountRecId from the source you require //from business logic e.g. in case of Fixed asset you can get from Asset Book //(AssetBook.DefaultDimension) and the main account is usually parameterized. Eventually there's //only one line of code for getting LedgerDimension

ledgerDimension =  LedgerDimensionFacade::serviceCreateLedgerDimension(mainAccountRecId, defaultDimension);

Tuesday, March 12, 2019

Microsoft Dynamics 365FO edit licence configurations

Even if you have admin rights you still may not able to edit licence configurations on your development VM. It is because the maintenance mode is disabled. You have to run the following command on VM to enable maintenance mode. Run CMD as administrator and execute following command:

C:\AosService\PackagesLocalDirectory\Bin\Microsoft.Dynamics.AX.Deployment.Setup.exe --metadatadir C:\AosService\PackagesLocalDirectory --bindir C:\AosService\PackagesLocalDirectory\Bin --sqlserver . --sqldatabase axdb --sqluser axdbadmin --sqlpwd AOSWebSite@123 --setupmode maintenancemode --isinmaintenancemode true

In the previous command the AOS is installed in 'C' drive, the database administrator user is 'axdbadmin' and its password is the default password of axdbadmin 'AOSWebSite@123'.

After running this command make sure to refresh your browser; in case it doesn't work reset IIS and login again it will work.

Monday, March 11, 2019

D365FO VM axdbadmin default password

The default password of D365FO / AX7 VM Administrator is 'pass@word1'.
The default password of D365FO / AX7 VM Database Administrator is 'AOSWebSite@123'.

This form is read-only unless the system is in the maintenance mode. Maintenance mode can be enabled in this environment by running maintenance job from LCS, or using Deployment.Setup tool locally

You may encounter the warning "This form is read-only unless the system is in the maintenance mode. Maintenance mode can be enabled in this environment by running maintenance job from LCS, or using Deployment.Setup tool locally" on any standard form which will also disable editing the form. The warning clearly says the maintenance mode is disabled. You have to run the following command on VM to enable maintenance mode.

C:\AosService\PackagesLocalDirectory\Bin\Microsoft.Dynamics.AX.Deployment.Setup.exe --metadatadir C:\AosService\PackagesLocalDirectory --bindir C:\AosService\PackagesLocalDirectory\Bin --sqlserver . --sqldatabase axdb --sqluser axdbadmin --sqlpwd AOSWebSite@123 --setupmode maintenancemode --isinmaintenancemode true

In the previous command the AOS is installed in 'C' drive, the database administrator user is 'axdbadmin' and its password is the default password of axdbadmin 'AOSWebSite@123'. You have to run CMD as administrator. 


Thursday, February 28, 2019

D365FO change EDT type or length precautions (Alert)

A common change request in organization is to change field length due to impetuous development in first place. Though it my look quite easy task for developer, wrongly done can cause hours of painful resolution. So better to be prescient and follow these steps:


  1. Make sure it is not out of the box EDT which is used on that table column. If it is out of the box try to find another EDT with you desired length or create new EDT. *But don't assign the EDT to that column in this stage*
  2. Take backup of the table (the xml file in folder) in which this EDT is being used. In case it is used in many tables on that form take theirs backup too.
  3. Delete the particular field from all the targeted tables.
  4. Build and sync (preferably build the model). In case the field is used inside any class or form code it will give error. Comment them all to successfully build and sync.
  5. Make sure you can run your form without that column. i.e. there is not any popup error or warnings. If there's still any error try to reset iis (open command prompt as adminstrator and write iisreset and enter) and clear usage data (from AX client go to option> Usage data>Reset).
  6. You may crosscheck by opening the SQL server and see if that column has successfully been removed.
  7. Now create the deleted column back using the new EDT (or with same EDT with length changed already). If it is possible create with different name (it is far more safe).
  8. Build and Sync.
  9. If sync is successful uncomment lines you commented for successful build in step 4.
  10. You can now see the column with updated length/type.

Tuesday, February 26, 2019

D365FO get datasource and FormRun from FormDataObject

When creating extension of any field of form datasource, the event handler passes FormDataObject as default parameter. We then have only this to get our any reference to datasource to which it belongs and the form it belongs. Here is an example to get any form related values:


    //Here my target field is Category which is inside <c>TrvRequisitionLine</c> 
    //datasouce of form <c>TrvRequisition</c>

    [FormDataFieldEventHandler(formDataFieldStr(TrvRequisition, TrvRequisitionLine, Category),
    FormDataFieldEventType::Modified)]
    public static void Category_OnModified(FormDataObject sender, FormDataFieldEventArgs e)
    {
       
        FormDataSource              trvRequisitionLine_DS;
        TrvRequisitionTable         requisitionTable;
        TrvRequisitionLine          requisitionLine;
        ormReferenceGroupControl    formControlLocationDetail;
        //Get datasouce
        trvRequisitionLine_DS = sender.datasource();

        //Get the formRun
        formRun = TrvRequisitionLine_DS.formRun();

        //Get currently selected record
        requisitionLine = trvRequisitionLine_DS.cursor();

        //Get any other datasouce you want form form with help of relation
        requisitionTable = TrvRequisitionTable::find(requisitionLine.TrvRequisitionTable);
       
        //Set any value of record field value based on your calculation
        requisitionLine.AccountingCurrencyAmount = 0;//TODO::Some calculations you need to do and set value of amount

        //Change state of any control on form
        formControlLocationDetail = 
        formRun.design().controlName(formControlStr(TrvRequisition,PerdiemTrvLocations_Details));

        formControlLocationDetail.mandatory(false);
        formControlLocationDetail.enabled(false);

    }

Tuesday, February 19, 2019

D365FO RecordInsertList

While traversing on while loop it's always not necessary to insert each record separately. There is another good way to do this; it is using RecordInsertList. It will minimize the number of hits to database. Here is code snippet to use it:


    RecordInsertList    recordInsertList = new RecordInsertList(tableNum(YourTargetTable));     
    YourTargetTable     yourTargetTable;

    while select  tabel1
    join table2
     where table1.RecId == table2.table1
    {
          yourTargetTable.clear();
          yourTargetTable.FirstField   = table1.AnyField;
          yourTargetTable.SecondField  = table2.AnyField;
          yourTargetTable.ThirdField   = table1.AnyField1 + table2.AnyField1;
          recordInsertList.add(yourTargetTable);
    }
   
    recordInsertList.insertDatabase();

Tuesday, January 22, 2019

Microsoft Dynamics Stopped (error): SysWorkflowQueue-resume X++ Exception: D365FO / AX2012

After submitting the Workflow for workflow you may encounter these errors. These can be caused both from technical and configuration reasons. 


Stopped (error): SysWorkflowQueue-resume X++ Exception: Work item could not be created. Insufficient rights for user *.
at SysWorkflowWorkItem-create
SysWorkflowWorkItem-createWorkItems
SysWorkflow-save
SysWorkflowQueue-resume


Stopped (error): SysWorkflowQueue-resume X++ Exception:  Token StartElement in state Epilog would result in an invalid XML document.
 at SysWorkflowEvaluationProvider-evaluateCondition
SysWorkflowEvaluationProvider-evaluate
SysWorkflowQueue-resume

AX Functional consultants can do following steps to solve it:


  1. Open AOT> Workflow> Workflow types>*YourWorkflowType* 
  2. In the properties window there will be 'DocumentWebMenuItem' and 'DocumentMenuItem' add these menuitems privileges to user role who is executing the workflow. If these menuitems are not part of any privilege ask the developer to create one and then assign.
  3. If it still does not solve the issue ask technical consultant to solve this issue.

AX Technical consultants can do following steps to solve it:

  1. Make sure the privilege of Document menu items is created.
  2. Open your Workflow query make sure the following:
    1. You have followed the parent child relationship for example if in case of SalesTable and SalesLine the SalesLine should be child node of SalesTable. SalesLine should not be in same hierarchy as SalesTable or hierarchy above it.
    2. There should NOT be any inner join in your query- very common mistake. Change all inner joins to outer join.
    3. Make sure you have made the correct relationship conditions of parent and child.
  3. After these changes make sure you Rebuild the project with Sync and reset IIS in case of D365FO and run incremental CIL and sync element in case of AX 2012.
  4. Create a new record to test if changes have been reflected.

Have a good day.

Monday, January 21, 2019

Microsoft Flow increment local variable

Microsoft flow has made it easy to loop through records, but you have to keep the loop count by yourself in case you need to do manipulation based on counter. Here is how to do it.


  1. Initialize a variable by clicking:

    1. Inset a new step the (+) sign on line
    2. Add an action
    3. In the search bar write 'initialize variable', then select Initialize variable element from list
    4. Give your variable a logical name and select the variable type from drop down. You have to give a initializing value to your variable.
  2. Increment variable:
    1. Go to the loop where you want to increment variable
    2. Add an action
    3. In the search bar write 'increment variable', then select Increment variable element from list.

    4. From the drop down select your variable, and in the value add the to be incremented by value.
  3. Use the value in your operation:
    1. Click the field where you want you use the variable
    2.  Select your variable to use

Have a good day :)


Tuesday, January 15, 2019

D365FO Table browser error: You are not authorized to login with your current credentials.

Hi,


If you can access AX from front end but cannot access table browser; there you need some configuration change. Here is how you do this:


  1. Open notepad as Administrator, from File menu click Open and navigate to
    C:\AOSService\PackagesLocalDirectory\Bin

    select the 'DynamicsDevConfig.xmlfile and click open


    In case you didn't find this DynamicsDevConfig file in Bin folder open this file from

    C:\Users\@YourName\Documents\Visual Studio 2015\Settings
  2. In the opened XML file scroll down to find the tag   <OfflineAuthenticationAdminEmail> and edit the value with your email. Save and close the file.

  3. Restart visual studio. Now you will be able to see table data in table browser.


D365FO Debugging

Follow the following steps to allow debugging in Dynamics 365 for Finance and Operations:

  1. On Visual studio go to Dynamics 365 > Options > Debugging

  2. On Visual studio go to Debug > Options > Debugging > Symbols
  3. Set your project as startup project by right clicking on project and selecting 'Set as StartUp Project'
  4. Set the element which you want to debug as startup object by right clicking on element and selecting 'Set as StartUp Object'
  5. Set a breakpoint in first line of code snippet which you want to debug.
  6. You now have two options:

    Option 1:
    • Start the project directly from Visual Studio by clicking on 'Start' button on Action pane or use shortcut F5. It will build the project and run on a new browser instance.
          Option 2:

    • Build your project (shortcut Alt+b,u)
    • On internet explorer login to your environment, in case if already logged in refresh the tab.
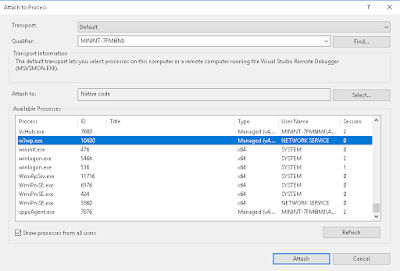
    • Attach 'w3wp.exe' process by clicking on Debug > Attach to process... (or use shortcut ctrl+alt+p). On the opened form check the 'Show processed from all users'  and select 'w3wp.exe' from the list and click Attach button. It will attach services need for debugging.


Your breakpoint will hit once you run your target form/class/report. :)


Monday, January 14, 2019

D365FO An error occurred during report data sets execution after adding a new dataset

Hi,


A common error in Microsoft Dynamics 365 for Finance and Operations reporting is data set execution problem. It usually occurs after adding another data set to your existing report. The problem is due to caching of previous report state in different programs. One of the following solutions will work for you:

Solution 1-  Restart report service
1.1 Open reporting server configuration


 1.2 Stop and then start the reporting service


Solution 2- Delete the cached RDL file, clear your usage data and build report again

2.1 Open the reporting server configuration

2.2 In the Web Portal URL you can see an URL click on it, it will redirect you to reporting web portal home page.

In case you are unable to click the URL click the 'Apply' button in the footer to enable the URL.


2.3 Delete the report RDL file.

2.4 Clear your usage data from AX -> Settings -> User options -> Usage data -> Reset
2.5 Build and deploy your report again.


You can now successfully run your report :)